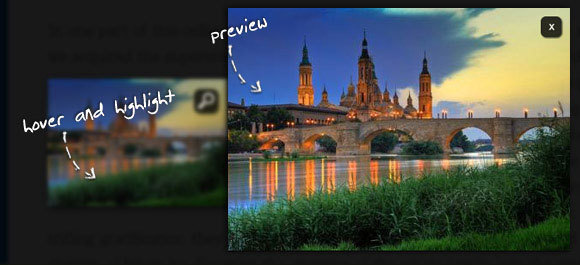
如果在一篇文章中插进一些精美的辅助图片,想必一定会为文章增添很多光彩,不仅内容看起来充实丰满,而且对于文章的排版也是大大的加分,可以让读者获得更加好的阅读体验。但往往在插入图片的时候,总会遇到或这或那的一些问题,导致图片太小、失真、错位、拖长加载速度等等问题。
那你是否有想过怎么为你的网站图片美化一番呢?怎么解决上面提到的那些问题呢?

今天主要的向大家介绍一个通过jQuery来实现:当鼠标停留在图片上的时候,图片将突出显示,通过可以点击可以预览原图(图片最大化)。这个效果相信很多人都见过,但是也有不少人有这方面的需求,所以拿出来和大家一起分享。在这里只是介绍基本的效果,大家可以结合自己的情况,为自己的网站制造出个性的图片突出显示和预览效果。
好了,那我们开始吧!
HTML代码
一般我们的图片需要准备两个尺寸,一个是原始尺寸(原图),另一个就是缩略图(thumbs),下面是我们的图片代码结构:
<img src="images/thumbs/1.jpg" alt="images/1.jpg" class="ih_image"/>
<div id="ih_overlay" class="ih_overlay" style="display:none;"></div>
这里的alt属性是为后面的效果准备的,主要是定义alt属性来引用大的图片,所以千万别漏掉哦。当然你也可以修改js代码通过别的属性来引用大图片,例如:src。
这里的一个div是作为遮罩层使用的,在突出图片或者预览图片的时候,需要把背景变暗。
接下来,我们来创建预览时候的HTML结构,因为当我们点击一张图片的时候,就要弹出相对应的原图出来,所以这段代码是会变化的,所以我们将通过js来创建预览时候的HTML结构,最终通过js输出来的结构如下(其中的images/1.jpg会变化):
<div id="ih_clone" class="ih_image_clone_wrap">
	<span class="ih_close"></span>
	<img class="preview" src="images/1.jpg">
</div>
这段HTML代码是通过js动态生成的js怎么写,将在下面介绍。
CSS样式表
这些样式表可以根据自己的需求自行个性化的修改。
.ih_overlay{
	position:fixed;
	top:0px;
	left:0px;
	right:0px;
	bottom:0px;
	background:#000;
	z-index:10;
	opacity:0.9;
	filter:progid:DXImageTransform.Microsoft.Alpha(opacity=90);
}
img.ih_image{
	margin:10px 0px;
	position:relative;
	-moz-box-shadow:1px 1px 4px #000;
	-webkit-box-shadow:1px 1px 4px #000;
	box-shadow:1px 1px 4px #000;
	opacity:0.7;
	filter:progid:DXImageTransform.Microsoft.Alpha(opacity=70);
}
.ih_image_clone_wrap{
	position:absolute;
	z-index:11;
}
.ih_image_clone_wrap span.ih_zoom,
.ih_image_clone_wrap span.ih_loading,
.ih_image_clone_wrap span.ih_close{
	position:absolute;
	top:10px;
	right:10px;
	width:24px;
	height:24px;
	-moz-border-radius:6px;
	-webkit-border-radius:6px;
	border-radius:6px;
	opacity:0.8;
	cursor:pointer;
	-moz-box-shadow:1px 1px 2px #000;
	-webkit-box-shadow:1px 1px 2px #000;
	box-shadow:1px 1px 2px #000;
	z-index:999;
	filter:progid:DXImageTransform.Microsoft.Alpha(opacity=80);
}
.ih_image_clone_wrap span.ih_zoom{
	background:#000 url(../icons/zoom.png) no-repeat center center;
}
.ih_image_clone_wrap span.ih_loading{
	background:#000 url(../icons/loader.gif) no-repeat center center;
}
.ih_image_clone_wrap span.ih_close{
	background:#000 url(../icons/close.png) no-repeat center center;
}
.ih_image_clone_wrap img{
	opacity:0.7;
	-moz-box-shadow:1px 1px 10px #000;
	-webkit-box-shadow:1px 1px 10px #000;
	box-shadow:1px 1px 10px #000;
	filter:progid:DXImageTransform.Microsoft.Alpha(opacity=70);
}
.ih_image_clone_wrap img.preview{
	opacity:1;
	position:absolute;
	top:0px;
	left:0px;
}
JavaScript
下面是js代码,里面的一些参数都有注释,可以自定义修改。
/**
* timeout to control the display of the overlay/highlight
*/
var highlight_timeout;

/**
* user hovers one image:
* create a absolute div with the same image inside,
* and append it to the body
*/
$('img.ih_image').bind('mouseenter',function () {
		var $thumb = $(this);

		var $clone = $('<div />',{
			'id'		: 'ih_clone',
			'className'	: 'ih_image_clone_wrap',
			'html'     	: '<img src="'%20+%20$thumb.attr('src')%20+%20'" alt="' + $thumb.attr('alt') + '"/><span class="ih_zoom"></span>',
			'style'		: 'top:' + $thumb.offset().top + 'px;left:' + $thumb.offset().left + 'px;'
		});

		var highlight = function (){
			$('#ih_overlay').show();
			$('BODY').append($clone);
		}
		//show it after some time ...
		highlight_timeout = setTimeout(highlight,700);

		/**
		* when we click on the zoom,
		* we display the image in the center of the window,
		* and enlarge it to the size of the real image,
		* fading this one in, after the animation is over.
		*/
		$clone.find('.ih_zoom').bind('click',function(){
			var $zoom = $(this);
			$zoom.addClass('ih_loading').removeClass('ih_zoom');
			var imgL_source = $thumb.attr('alt');

			$('<img class="ih_preview" style="display:none;"/>').load(function(){
				var $imgL = $(this);
				$zoom.hide();
				var windowW = $(window).width();
				var windowH = $(window).height();
				var windowS = $(window).scrollTop();

				$clone.append($imgL).animate({
					'top'		: windowH/2 + windowS + 'px',
					'left'	        : windowW/2  + 'px',
					'margin-left'	: -$thumb.width()/2 + 'px',
					'margin-top'	: -$thumb.height()/2 + 'px'
				},400,function(){
					var $clone = $(this);
					var largeW = $imgL.width();
					var largeH = $imgL.height();
					$clone.animate({
						'top'		: windowH/2 + windowS + 'px',
						'left'		: windowW/2  + 'px',
						'margin-left'	: -largeW/2 + 'px',
						'margin-top'	: -largeH/2 + 'px',
						'width'		: largeW + 'px',
						'height'	: largeH + 'px'
					},400).find('img:first').animate({
						'width'		: largeW + 'px',
						'height'	: largeH + 'px'
					},400,function(){
						var $thumb = $(this);
						/**
						* fade in the large image and
						* replace the zoom with a cross,
						* so the user can close the preview mode
						*/
						$imgL.fadeIn(function(){
							$zoom.addClass('ih_close')
								 .removeClass('ih_loading')
								 .fadeIn(function(){
									$(this).bind('click',function(){
										$clone.remove();
										clearTimeout(highlight_timeout);
										$('#ih_overlay').hide();
									});
								$(this).bind('click',function(){
									$clone.remove();
									clearTimeout(highlight_timeout);
									$('#ih_overlay').hide();
								});
							});
							$thumb.remove();
						});
					});
				});
			}).error(function(){
				/**
				* error loading image
				* maybe show a message like
				* 'no preview available'?
				*/
				$zoom.fadeOut();
			}).attr('src',imgL_source);
		});
}).bind('mouseleave',function(){
	/**
	* the user moves the mouse out of an image.
	* if there's no clone yet, clear the timeout
	* (user was probably scolling through the article, and
	* doesn't want to view the image)
	*/
	if($('#ih_clone').length) return;
	clearTimeout(highlight_timeout);
});

/**
* the user moves the mouse out of the clone.
* if we don't have yet the cross option to close the preview, then
* clear the timeout
*/
$('#ih_clone').live('mouseleave',function() {
	var $clone = $('#ih_clone');
	if(!$clone.find('.ih_preview').length){
		$clone.remove();
		clearTimeout(highlight_timeout);
		$('#ih_overlay').hide();
	}
});
最后可别忘了引入jQuery库。
好了,就这么多,希望你会喜欢并且可以帮助到你。
参考资料:codrops


很酷,正打算给博客加上这个效果O(∩_∩)O~~
测试下是否还要审核
这个效果不错,以后用的上,先收藏起来